
September, 2017
Before we move on to talking about ceiling joists, I wanted to get in a few more images of the posts and tie beams. They’re way more poetic than ceiling joists.


On to those ceiling joists. I guess I’m not as excited about them because they didn’t come from our woods. We bought them from the local mill and then borrowed a tractor to haul them up the hill. Milling is important because they needed to be straight enough to hold up a metal roof, and J. won’t let me thatch the roof. Maybe he would if I knew how.
But back to those joists. They are beautiful, as milled lumber goes: rough cut 4 x 6 Douglas Fir. Pink as a baby’s bottom. J. cut tongues into half of them and forks into the other half (I’m sure these are the correct terms) so that along the roof-ridge the joists will meet with a mortise and tenon joint. Here they are, forks on the left, tongues on the right:


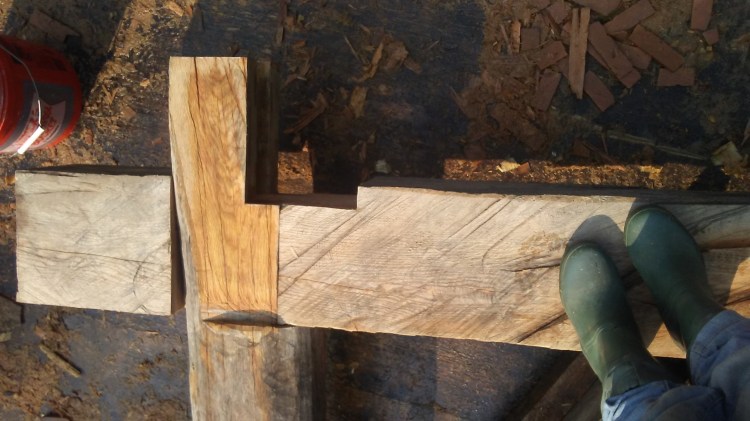
The other ends of the joists will rest on the wall plate, and a simple groove was cut into their ends to fit into the wall plate.

Lastly, each wall plate needed a notch to receive the joists. This cut is called a bird’s mouth. Hopefully you can see why from the pictures. It seems like a complicated cut, but it flies pretty fast (no pun intended) with the help of a mal or pattern guide, which you can also see in the pictures.


Here let’s take another break so show what others in the household have been up to:


Also, a couple of the creatures that have been hanging out with us:


And that’s it! The frame is cut and done! We do have another big step before we start calling you all for help raising the house (that’ll be the next blog post), but you might want to start checking your voicemail!
Or avoiding it…

I love woodwork, looks like a cool project you have here, a little jealous!
LikeLike
Thanks! I like what you’re doing too!
LikeLiked by 1 person
It’s fun working with your hands and appreciating the efforts at the end 🙂
LikeLike