Plaster Complete!

August, 2019

Some people run marathons. Some climb mountains. Some walk burning coals. We build a house.

Let me catch you up on our adventure of choice. I haven’t written much lately because my hands have been too tired and sore to type. I know, whine, whine. Turns out, plastering is hard! It’s heavy! It does not always want to stick to the wall!

We were totally right to fear it.

It was so hard that we didn’t accept help from our friends who offered, fearing they would no longer be our friends after the jobs we would make them do. So we only asked for help from people we didn’t like.

šŸ™‚

So where were we? After the first coat of plaster we took a few days to camp on the shore of icy Lake Superior, refreshing ourselves. It’s nice that the plaster has to cure for 14 days before the next coat–this enforces a break, in which you can stack stones, or try to get in the water. Or just lie around and…not plaster walls.

20190709_082731.jpg

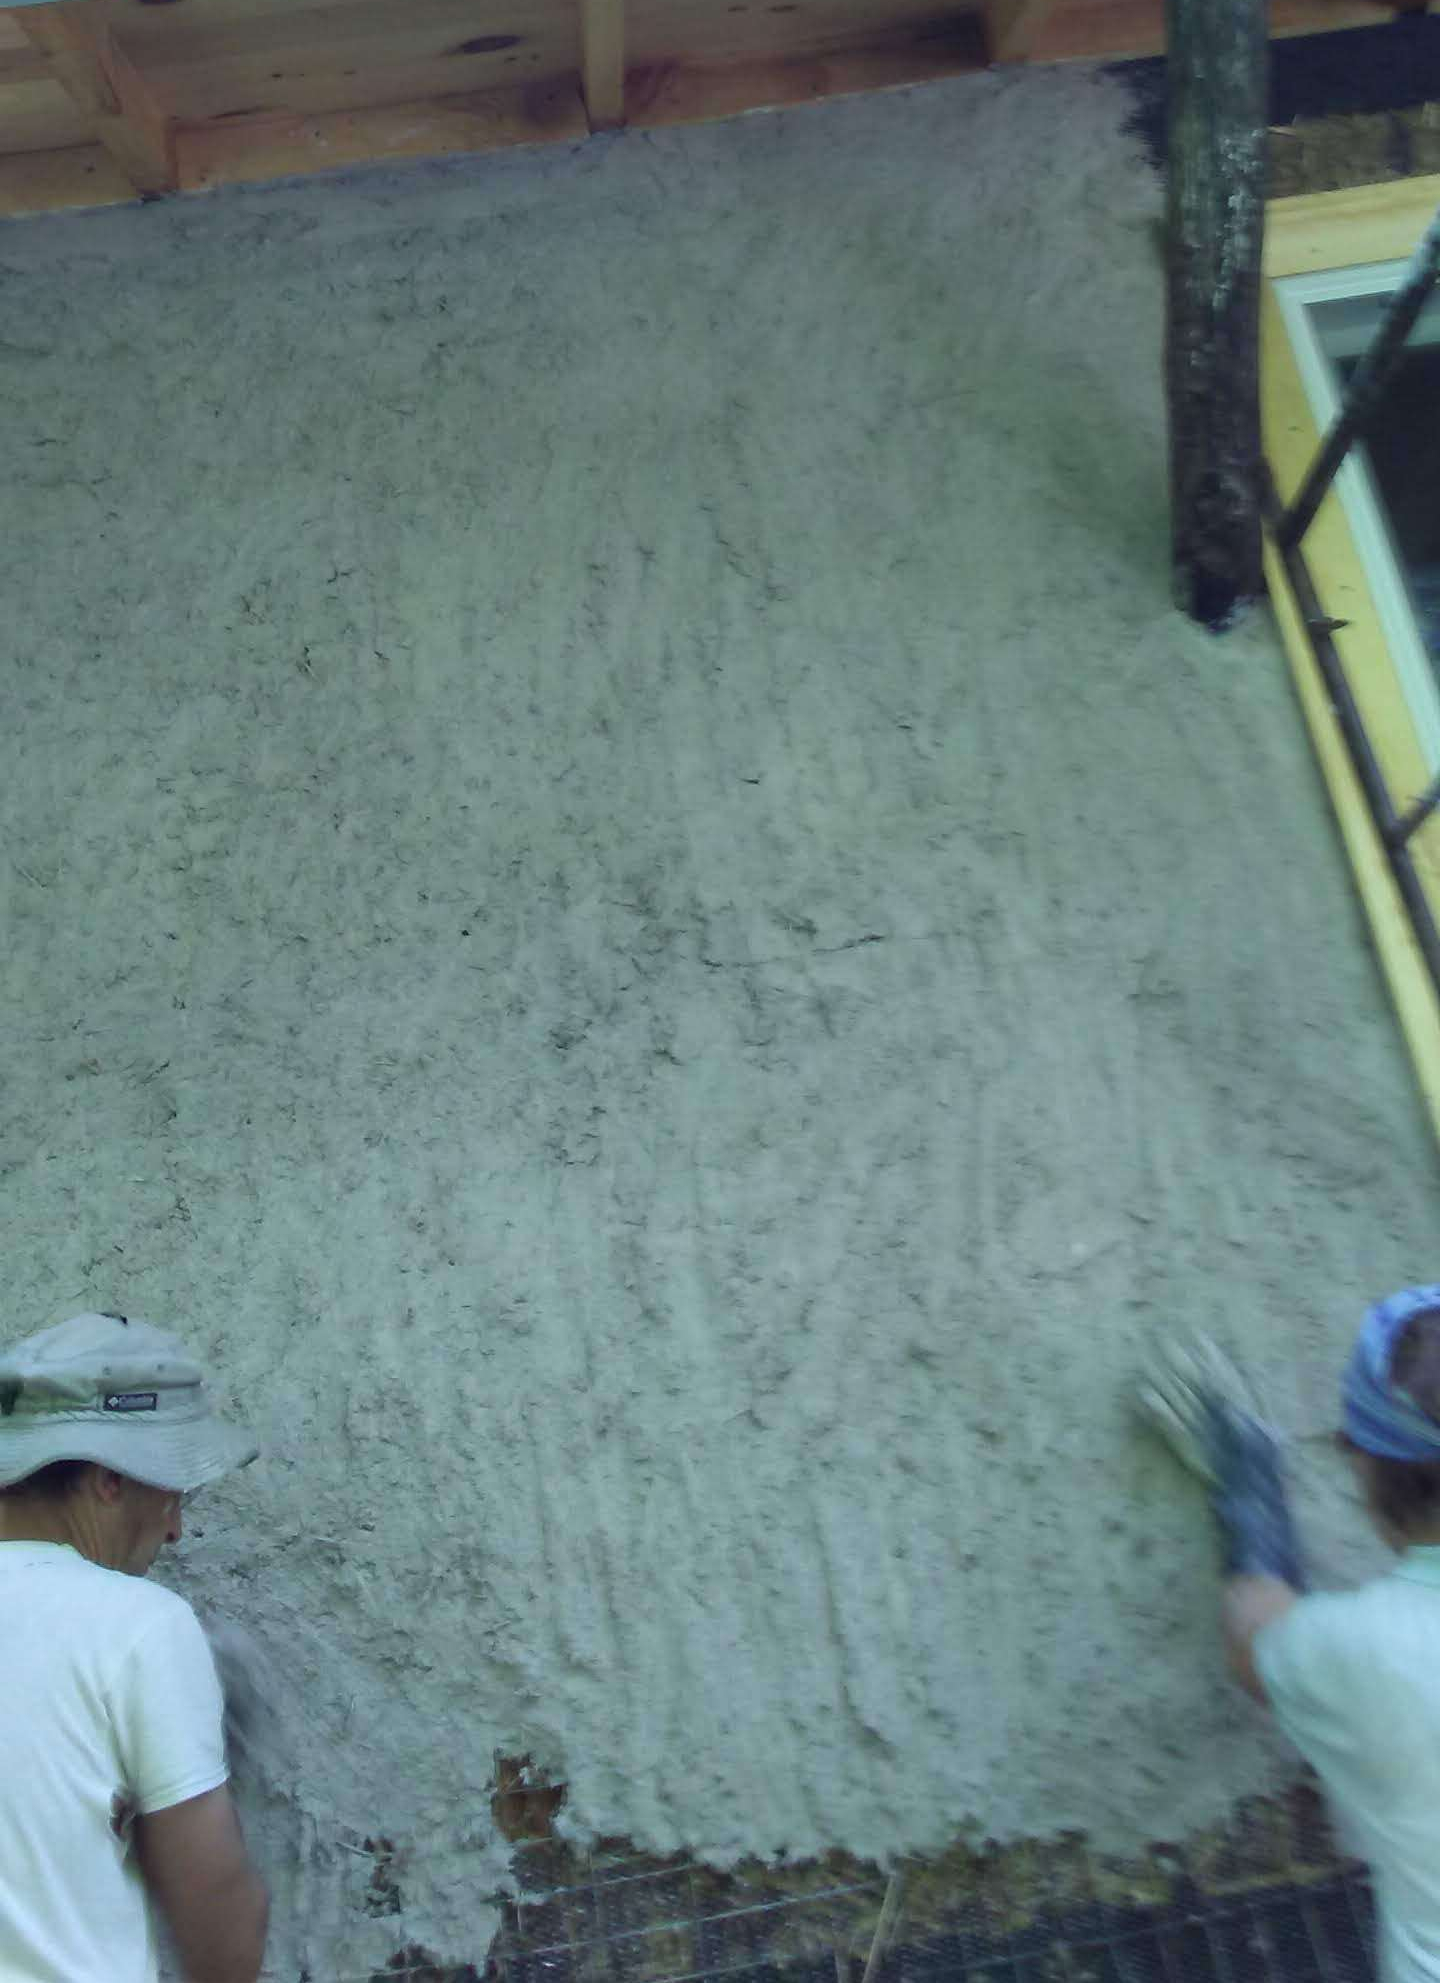
When we got back to the house, we were encouraged to see that our mushy, squashy harl coat of lime plaster had cured nice and hard. Rapping on the walls with a knuckle yielded a skinned knuckle. So far, so good.

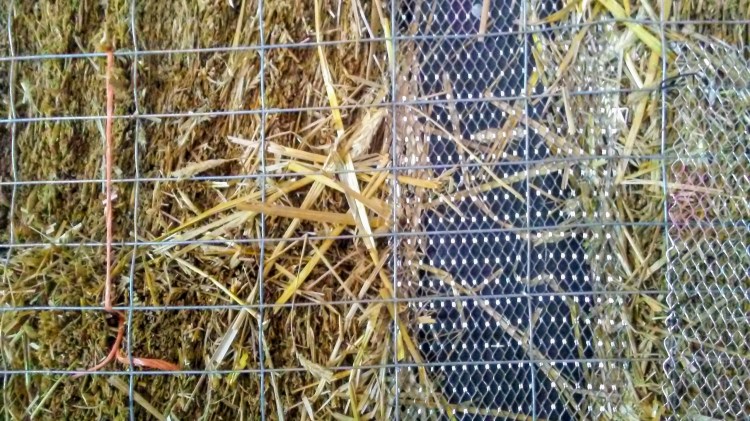
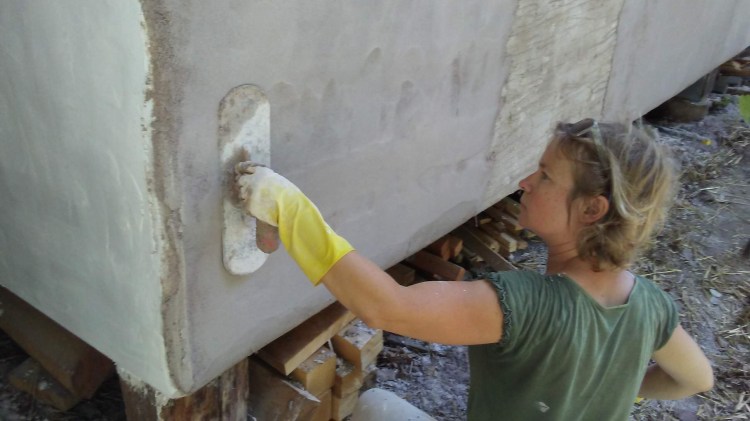
We started the second coat of plaster. Whereas the point of the first coat is to create a good bond between the straw bale walls and the wall, the second coat is the leveling coat, in which you try to create a flat wall. So in some places we built it up to an inch thick or so, and in some places it’s barely a skim over the previous coat. Some people also call this the float coat, because you scrub/burnish/”float” the plaster as it dries to compress it, which also heals any cracks and raises the grain to key into the next coat.

The recipe was mostly the same as the first coat, with slightly less lime, the theory being that as you move outward from the straw bales, you need more strength from the sand and less anti-fungal, moisture-wicking magic from the lime. So:

  • 2 (4 gal.) buckets sand
  • 2/3 (4 gal.) bucket lime putty
  • 1 (1 gal.) bucket straw shavings
  • 1/3 gal. grog
  • water

(For more details on the materials, see my previous blog entry.)

20190715_102214
Coat #2 begins.
20190725_141510
Maybe you can see the various thicknesses here. That may have been why I snapped this photo. I can’t remember.

As in the previous coat, we wet the wall down with water before applying the plaster, and then sprayed it daily for a few days as it dried. After this layer dried a little, we floated it with the hard rubber float, which further leveled the wall, burnishing out the worst of the tool-marks and compressing its surface. This takes a lot of force–the action feels more like scrubbing dirt out of your kitchen floor than the ephemeral-sounding “float.” Then we scratched it again.

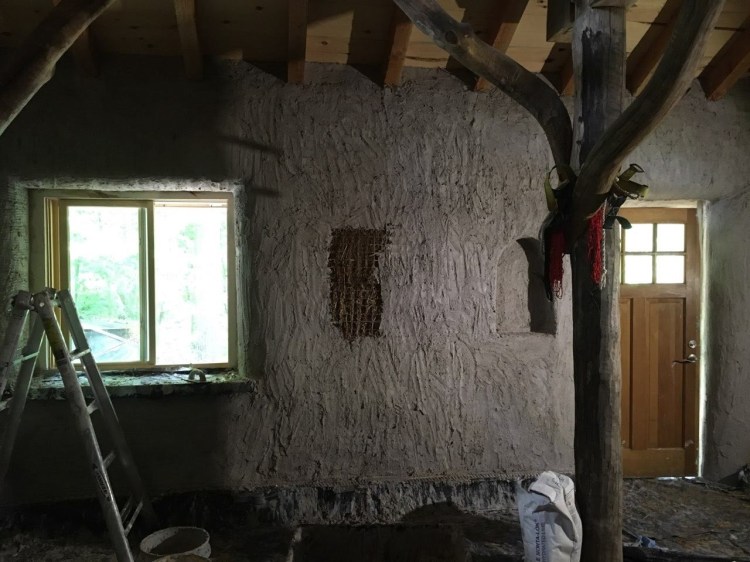
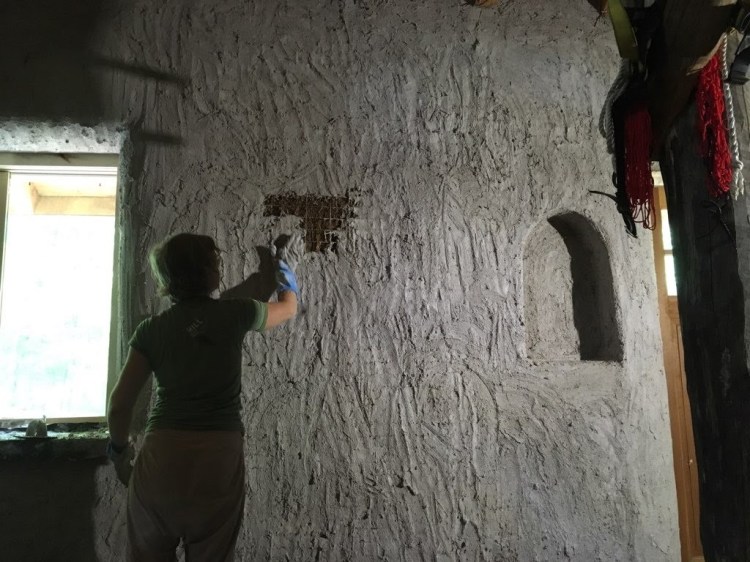
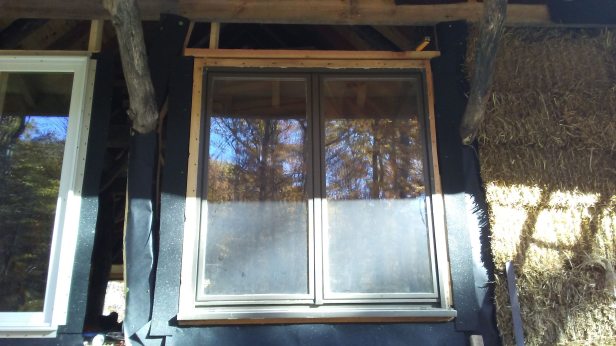
Into the plaster, while it was quite wet, I pressed a few tiles for a backsplash behind the kitchen counter and also as baseboard around the curved entryways. I’m not sure if this was a good idea–time, I suppose, will tell. I did it this way so we can trowel the final coat of plaster right up to the edges of the tiles, but I’m worried that the plaster won’t adhere well to the tiles. I guess we’ll know it was a bad idea if they start popping off into my bread dough.

20190719_111030
But, so far, so good. I made the tiles from scrap clay and fired them in odd corners of my wood kiln.

I have no pictures of the floating because I was just trying to keep my head above water. Or, to try another metaphor: I was busy undergoing a trial by fire. That’s how it felt. You don’t take pictures as you’re drowning, or burning. Mornings we watered the previous day’s wall, floated it (this took an hour or more per wall), and scratched it, then watered the wall we’d work on that day, all before finally settling down to mix plaster and trowel it on. So we’d barely get a load of plaster mixed and on the wall before we’d feel all wobbly and need to eat lunch. Then we’d work until the wall was done and drag ourselves home to root around for something for supper, drinking pickle juice like mother’s milk to rehydrate, and then bide our time until an acceptable hour to retire.

Therefore, the pictures are rare.

20190725_141420
And sadly, none of the pictures IĀ did take show how well the float coat worked to, in fact, level out the wall. It went from a shaggy skin over straw bales to a pretty decent (if undulating) wall.

Here’s what the kids did while we put on the second coat:

20190816_123058.jpg

So after two weeks of work we finished the second coat, inside and out, strung up the tarp to slow the plaster’s curing, and then headed to Lake Michigan. Because apparently that’s what you do while plaster cures: you go visit a Great Lake.

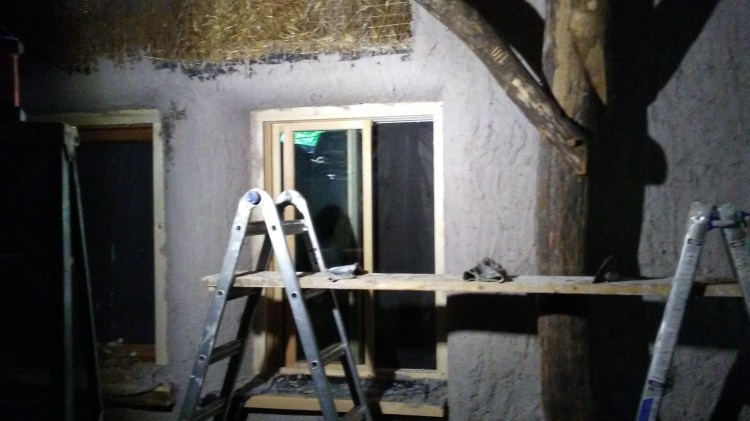
By the time we got back from Michigan, it was the end of July and time to start–glory, hallelujah–the Final Coat. Here’s the recipe for this one:

  • 2 (4 gal.) buckets of sand (I highly recommend using fine sand, but we couldn’t find any nice sharp fine sand without spending a week sieving the sand we had–so we just used our coarse sand and later only regretted it slightly)
  • 2/3 (4 gal.) bucket of lime putty
  • 1/3 (1 gal.) bucket grog
  • water

The mix was mostly the same as the second coat, minus the straw–an exclusion which made the mud easier both to mix and apply. Plus the final coat is quite thin, just a skim coat really, so each batch went a lot farther, resulting in much less time at the wheelbarrow with the hoe. J., by now, had taken over plaster-mixing completely, a heroic task which he undertook without complaining (unlike someone we all know…).

20190807_113052
The final coat going on. The pillar on the far right is complete. Plastering the undersides of the window wells was kind of difficult–since plaster is affected by gravity, it doesn’t want to stick to the underside of anything. While wrestling it up there I meditated on the Sistine Chapel, and came away with a new appreciation for Michelangelo’s triceps.
20190808_163052
This corner is complete.

The technique we used for the final layer of plaster was to scrape it on with the trowel like butter, then burnish it with a pool float, a delightful tool with round edges that don’t gouge and a flexible metal surface that rides the undulations of our wall without imposing it’s own sense of what’s vertical.

20190817_125246.jpg
Here’s J. putting on the final coat…
20190817_130334
…and here’s me floating it with the pool float.
20190817_125205
And here the wall begins to dry in all its smooth, undulating glory. Care had to be taken to keep dry edges to a minimum. Even so, our lunchbreaks will be preserved for all eternity by the cold joints they left.

As long as I’m giving out recipes, let me share one for the homemade scrub/balm that saved our skins while we plastered. Even though we wore gloves, the lime still wormed its way into the gloves so that some days as we worked we seemed to be soaking our hands in alkaline water. And while it didn’t exactly burn, it worked on our skins like the salt you sprinkle onto a zucchini to draw out its moisture. So here you go:

Gardener’s Hand Scrub

  • 1 c. sugar
  • 1 T. sea salt
  • 1/2 c. coconut oil
  • 5 drops tea tree oil (if you have it on hand)

Melt coconut oil until liquid. Pour in sugar and salt and mix until sugar is thoroughly coated. Add essential oil and stir. Pour into container. To use, moisten skin and rub a pinch of the stuff all over hands and arms, scrubbing off bits of dried lime or dirt/whatever. Rinse and dry and revel in your recently moisturized, healed skin.

*

So we finished! Like magicians revealing a trick, we tore away the dropcloths and swept off the window seats. I have no pictures of the house complete! You’ll just have to stay tuned for the next entry (coming soon).

I know you’re disappointed, but here’s how we felt:

20190808_150053

Oh, and by the way, here’s what the kids did while we put on the third coat:

20190816_123115-e1566438897612.jpg

*

Long before we had those bouncing little dears, J. and I took a trip to Italy, during which we borrowed some bikes and took it upon ourselves to pedal up a mountain. (Maybe in Tibet it would not be a mountain, but to this Midwesterner it was.) The road kept going upward in great curves–every corner we turned continued up hill, while my thighs screamed for relief. I wanted to walk my bike up. Or to call the view good enough, turn around, and sail back down. But J. said, “Just keep pedaling. You don’t have to pedal fast. Just keep pedaling.” So I did, and I reached the top still pedaling, elated, and it was worth it.

I’ve thought of that climb many times this summer, times I wanted to give up, and then I would hear J.’s voice in my ear: “Keep pedaling.” So I would. And we made it.

As if that weren’t enough, during this plastering summer I entered my fourth decade. Instead of feeling old and washed up (which is how I imagined it would be like to turn 40 back when I was turning 20), I’m stronger than I’ve ever been. Muscles have shown up under my skin that I’ve never felt before. More than that, though, I’ve gained a sense of courage and determination, a confidence in the labor of my body, that simply by not giving up, by keeping pedaling, I can arrive at somewhere great.

Because this mountain is almost climbed. We can see the summit from here.


First Coat of Plaster Done!

June, 2019

Have you ever staked a 4 year project on a skill you did not have, had only read about, and half of that was horror stories online, and most of the rest urged you to hire a professional; and the appropriate materials were unavailable in your area so you had to make do with substitutes based on knowledge and experience you did not have; and you knew that even the professionals rely on conveniences (like electricity and running water) to make the job easier, and you don’t have those, so it’ll be even harder for you, a novice?

I have.

[Apologies and winks to Tom Papa]

It’s hard to fully describe the almost tangible fear/anxiety/elation we felt as we finished the last details on the straw walls. Applying the necessary three coats of plaster, inside and out, would be the last big job before we could move in, but exactly how it would go and what it would be like, we could only guess. Plastering was a dark fog looming before our very toes.

The urgency to begin only grew as we ticked off the final preparatory details on our list, and May turned into June. The early start we had planned evaporated. Since plaster needs to cure frost-free for two weeks at least, which in our climate means finishing up by the beginning of September at the latest, and because of our utter lack of experience we had no idea how hard it would be or how long it would take to apply three coats of plaster, we began to develop facial twitches.

20190618_083138
All ready for plaster, except for a drop cloth.
20190618_083120
Plastic drop cloth? Check.
20190618_082959
Another job before we could plaster: installing this beautiful, wide, live-edge oak baseboard, milled from our own trees. We’ll plaster the walls up to it, so the surface of the wall will be flush (more or less) with the board.

Finally, all was ready. We assembled our plastering tools, gathered our materials, flexed our muscles, and went to bed early.

The next morning, J. woke up with a cold, the kind that keeps you in bed for two days. So the trepidation grew. I had nightmares. My stomach had butterflies.

When J. was finally healthy the whole family tramped into the woods for the ceremonial first day of plaster.

20190619_155004

We had it all set up. Loosely left to right: generator to power the cement mixer, pile of sand, cement mixer, stainless steel milk tank full of rainwater, vinegar to neutralize spills, tools for mixing, and buckets of lime soaking in water. (The wood scraps behind are simply an incidental, if aesthetically dubious, backdrop.)

First off, we discovered that the cement mixer wouldn’t work. Our generator wasn’t strong enough to power it. But after borrowing a neighbor’s generator, we discovered that it still didn’t do a thorough job of mixing. Turns out, you need a mortar mixer for plaster–a fact I had read, but sometimes I like to test these things out for myself.

So here’s our altered set-up:

20190622_094700.jpg
It sort of brings us back to our roots, when J. mixed the concrete for the foundation piers in a very similar way. Mixing with a hoe makes a much quieter job site, without the noise of a generator and cement mixer. That’s a positive way of looking at it.

A final job before plastering: wetting the wall, to keep the bales from sucking moisture out of the plaster too quickly. A well-equipped plasterer has a hose and water supply for this, but we’re using a garden sprayer filled with rainwater. We find it works quite well, if a little slow. But we’re used to slow. Plus, using a tool to build our house which wasĀ  originally intended to spray pesticides feels a little like turning a sword into a plowshare.

20190618_082933
It’s a good kid job.

Here is the recipe we used for the first coat of plaster:

  • 1 (4 gal) bucket type S hydrated lime, slaked in water so it’s putty-like but in reality still pretty sloshy
  • 2 (4 gal) buckets sharp sand (mason sand or concrete sand)
  • 1 gallon packed, chopped straw
  • 1/3 gallon fine grog (from the local pottery supply) to act as pozzolan, a material to make the plaster more weather-proof
  • water to make a workable (read: mixable by hoe) mud.

* When plastering over the stucco lath (aka blood lath) we omitted the straw, which had been keeping the plaster from fully entering the holes in the mesh.

Aside from lime’s tendency to burn the skin and its just-plain-heaviness, the plaster is quite a pleasurable material to work with. Once we got the hang of it, we could slap it on almost quickly, smearing and shaping to our gloved hands’ content. The experts use a hawk and trowel, but we found that those tools require the strength and endurance of very specific muscles which we have yet to develop. So rubber gloves and a bucket it is!

20190619_155157
A trowel was helpful for easing plaster neatly up to the wood edges, but everywhere else got the glove.

The plaster was easy enough to apply, so everybody gave it a try.

20190618_141213.jpg
Plus, climbing the scaffolding remains a draw.

Some people call the first coat the “harl” coat because you’re supposed to “harl” the plaster into the wall to get a good bond between substrate and plaster. This is also super fun. You gather a snowball-sized ball of mud into a hand and harl it into the straw, then smear upward with any remaining plaster in your glove. As a potter, I took to the whole process and the material intuitively. My printmaker husband, I suspect, found it less than intuitive, but still plodded along gamely. He knows I mostly keep him around to mix plaster anyway.

By the end of the first day, we finished one outside wall, and this is how we felt:

20190618_143802.jpg
Filthy, but elated.

It looked great. Once our work had set up a little, we scratched it with a homemade scratching tool to give the surface more tooth to bond with the next coat. Hence people also call this the scratch coat.

We continued the next day, just a touch sore from the previous day. Covering the work of the day before with a tarp helps to slow the drying and allows the plaster to cure slow and hard, but sadly has also dampened our sense of accomplishment, since to this day we have yet to see the entire house plastered and uncovered.

20190619_162747

By the end of the fifth day, we finished the entire exterior, but there’s no picture of that because the house looked much like it has in the past: swathed with a tarp, as familiar as that hoodie you keep handy to pull on when the evening cools.

20190621_085327

We took a day of rest and sent the kids to Grandma and Grandpa’s so that, fueled with a diet of summer sausage and Ritz (oddly similar to our subsistence the entire length of our honeymoon), we could more fully focus on the work of plastering the interior.

20190624_124037

Because of the tarps, the interior is super dark so it’s hard to photograph, much less see what you’re doing when you’re plastering. But we persisted with a battery powered work light, exhilarated to watch the surface of the house emerge with each batch of plaster.

20190624_124054

20190625_142337.jpg

It was an amazing thing to apply a skin to these walls which we had been forming for months. All the tiny detail work, the attention paid to each nip and tuck, turned out to be well worth the work. It was a dream (a well-earned dream, paid for in blood, sweat, and tears, but a dream nonetheless) coming true under our very gloves. Because suddenly the straw bale walls became walls, the kind you could live inside your entire life and forget what they’re made of, the kind that becomes familiar while the seasons and the days play their distinctive shadows in each curve and hollow. Suddenly I could imagine my children’s voices ringing on these walls; I could envision meals eaten here and prayers spoken.

20190625_142445

But back to details: you may notice we’re not doing a perfect job of keeping the woodwork clean–the plan is to come back after the plastering is done to scrape and oil the unfinished trim, then caulk the cracks that form between wood and plaster. It will be a lot of caulk.

20190627_141133
The niches were especially fun to plaster.
img_01871
The last bit of straw.


img_01891
Time to say goodbye to the straw, hopefully forever. Oddly enough, it was a moment of mixed feelings.

So finally we plastered over the last bit of straw and cleaned up the tools and sat down to look at our work with relieved, exhausted gratitude. It had taken 9 of the last 10 days, which we had spent almost entirely plastering, eating a little, and sleeping, but the fact remained that the first coat was on the house, inside and out, and it was still only June. Our fears appear to have been unfounded.

We’ll take a week’s break to let our skin recover from lime burns, let the plaster cure nice and strong, and catch up on our nutrition; then we’ll hit that next coat hard. Easy peasy.

Almost Ready for Plaster (And Move-in!)

May, 2019

It’s been so long since I wrote I’m sure you’ve all forgotten we’re building a straw bale home. Mostly I haven’t written because what I’ve been doing isn’t that photogenic. Or share-worthy. The straw bale walls are up, the windows are in, what are they, twiddling their thumbs over at The Clay Life? Are they expending all their energy biking their laundry so they have nothing left for building their house?

Turns out, building a house is more a marathon than a sprint. In case you just tuned in to this blog and hadn’t figured that out yet. While I did spend January and February cozily in the studio working on pots instead of the house, the rest of the cold season after a morning of studio work I would put on the layers to slog up the snowy hill for afternoons of work on the house.

Naively, I had thought that once the straw bales were up last fall, we’d be able to plaster the walls in a few short weeks, after attending to some minor preparatory details. Because isn’t a straw bale house just a bunch of straw bales stacked under a roof? Turns out, it’s way more kinky than that. An ENTIRE (minus those studio months) WINTER’s worth of “minor details”! Because a straw bale house is in fact a maze–a trap–full of tiny, kinky details that mean the difference between a lumpy, pitiful-looking shack and an elegant yet understated cottage whose gently undulating walls suggest that it was hand-crafted with skill and care. You can guess which direction we hope to lean.20190412_120607

In the picture above you can see some of those kinky details. The wooden header supporting bales over the doorway has been covered with black tar-paper to keep the plaster from sticking to the wood, where it would crack. But since the plaster won’t stick at all to the tar paper, it also had to be covered with blood lath. I know. The places where I stuffed loose straw also needed to be covered with lath, as you can see above in the alcoves between ceiling joists. On top of all that is a wider mesh, which I’ll illuminate in a little bit.

20190423_123259-1

Here’s a [blurry] shot from the ladder of the curve at the top of the wall, where the straw bale walls needed to meet the thinner, more conventionally insulated second story wall. The second story floor joists will rest on a wooden cleat at the top of the straw bale wall. You can see the tight work spaces I navigated this winter: six inches of space between the timber frame and the wall, in which I used twine to cinch the top bales tight against the wood wall, nailed blood lath to the wood, bent and wired it to the mesh below, and stuffed the curve with straw. Then scooted my ladder down and measured for the next piece.

20190423_123246-1
Still, the view from my ladder wasn’t bad. Maybe just a touch cluttered, but it has promise.

So yes, this winter I learned to pound nails with a hammer. I learned to pound nails between the rungs of a ladder. I learned to pound nails with my non-dominant hand. I learned to pound nails with the side of the hammer when space was too tight to use the head of the hammer. I learned (not well) to pound nails by sound and feel when I couldn’t see them. I cut blood lath with a tin-snips, and I bled.

Once I was mostly done installing the blood lath, I moved on to the other mesh you see in the pictures: 2″x 4″ welded wire fencing, which helps to give the wall rigidity, tying all the bales together in a unified wall. J. ran the chain saw over the wall to trim up loose straws and odd corners of bales sticking out, then it was ready for the fencing. I used fencing staples to attach it to the wood at the top of the wall, both inside and out, then got out my trusty old bale needle. I used the needle to punch twine all the way through the wall, cinching the bales tight between the two layers of fencing and stuffing straw in low spots as I went. I kept a bale needle inside and one outside and scrambled up and down the ladder, pushing twine in from the outside and out from the inside, like a giant, 16 inch thick quilt.

20190412_120539-1
On the left you can see some orange twine, my quilting thread of choice this winter.

I also put in a few niches, which are standard straw bale house fare.

20190412_120521
Also meshed, fenced, and sewn to within an inch of its life.

Oh, I almost forgot. J. also did not twiddle his thumbs this winter. He tried his hand at building windows, and did a plumb job. (Ha! I made that one up myself.) Most of the windows we had bought secondhand came in their jambs, but on a few the jambs had broken upon de-installation. And since these were sliders and what we had wanted from the beginning were french windows, AND since I’m married to a guy who can make anything, we thought we’d shoot to turn those orphan window panes into french windows.

20190223_141324.jpg
So he did. With wood milled from our own trees.
20190517_121530
Bathroom view.

So now we have french windows in the gable ends upstairs and one in the bathroom, and as we install trim on the rest of the windows, we want to keep the whole works easily removable, with the intention of replacing them all with frenches at a later date.

20190517_121506.jpg
A view from below of one of the upper windows.

The window trim, on the inside and out, will double as a plaster stop. It’s a little hard to get straight since in places the straw bulges against the window frame…but hey, it’s a hand-built house. It’ll look great.

20190420_153853

20190501_121120
We even have a set of doors, and they have trim around them too.

So as you can see, we’re getting closer and closer to plastering, after which we plan to move the heck in. We’re so close that I’ve already had a nightmare about it. The plastering, that is–that great unknown looming before us.

There were plenty of times this winter when I tossed off my boots with their two pairs of wool socks, when I rubbed my sore, cut hands together and wondered, “Is this worth it?” Would we have launched into this project if we had known the hours, months, years of hard, constant labor we would dedicate to it? Shouldn’t I be doing something else with my life, like reading a book?

20190307_110402

This spring I’ve been watching a wood peewee weave her nest above my kiln shed, bringing tiny beakfuls of grass and combining it with mud and other mysterious wonders to create this new little thing in the world, made just by her (and her husband), in the way they know how, with the materials they know how to use, to be just the right home for her little family. She will not be waylaid from her task–she does what is in her to do, and she does it well.

So I, like the wood peewee, do what is in me to do, to work through pain and cold because it’s something I believe in, because I’ve been made to do it, to make beautiful things, to weave a home for my family. You might have to put me in a cage, tie my wings behind my back, to keep me from doing this. Maybe there are better ways to spend one’s life, but for me at this time, working with my hands in the quiet of the winter woods, making something that will ring with the laughter of my family, and making it well: this is where I belong.

So here’s our to-do list:

20190223_131719.jpg

This also (*sigh*) is where I belong.


One Year into Bicycling the Laundry

April, 2019

That’s right. I’m still pedaling our laundry, a year later. To be clear: not the same load of laundry I started pedaling a year ago, but a year’s worth of four people’s dirty clothes, biked clean and hung dry three times a week.

Wait…that sounds just a touch heroic. For me, it’s simply a chore that I’ve fit into my life, that I even enjoy a little, a comfortable routine that indicates all is well.

If you’re like most people and just read these last few sentences with incredulity, let me assure you I’m not a fitness nut, a Martha Stewart disciple, or a planet hero/weirdo. I’ll try to explain myself.

I recommend that you go back and, if you haven’t already, read my first entry on this topic,Ā Doing Laundry by Leg (Not by Hand),Ā in which I rehash in painful detail the first iteration(s) of our bike-powered washing machine. Since publishing that article, I’ve made several improvements in the system.

First, the machine took a great leap forward when I removed those extra long bolts (prone to shearing off) and simply flipped the aluminum flywheel, reconnecting it to the plywood circle/chain ring…well, a picture is worth a thousand words:


This allows a much stronger and more direct connection between the flywheel–hence the laundry drum–and the pedals, so I can pedal forward and backward without derailing anymore, and the laundry agitates left and right, just like those new-fangled electro-automatic laundro-machines that turn your clothes sparkling white. I felt a little silly that it took me so long to figure out this simple solution.

Secondly, I’ve been unable to develop Lance Armstrong-sized thighs, which means I still can’t pedal fast enough for a decent spin-cycle. So my lovely husband found me a clothes mangle, a.k.a. wringer. (It may or may not have been a Valentine’s Day gift. That’s how we roll at The Clay Life…)

20190330_142448
In family trivia, my great aunt and uncle worked at the Lovell MFG Co., which made the Niagara Ball Bearing Clothes Mangle. I like to think that one of them touched this very wringer.

We mounted the thing over a sink with a bucket drain, and it has improved my life greatly. Somehow the action of cranking the wringer is much more pleasant than wringing with my hands–probably it’s just easier on my hands and plain old fun to crank the big rollers. The wringer does tend to crack buttons, pinch clasps closed, and, true to its name, “mangle” zippers, so I still wring a few garments by hand.

Thirdly, I jerry-rigged a slick book rack.

20190330_140714.jpg

So now I can do three things at once: exercise, do laundry, and read a book!

I’m still working a couple bugs out of my system. (And here let me interject that now that it has no motor, I can fully understand the mechanics of my washing machine, which I find empowering–can you say that of yours?)

The main bug, maybe not specific to a bike-powered machine, is the fuzz factor. As I hang up the clothes, I pull off bits of accumulated fuzz and hair that, instead of rinsing away, seem either to snowball into clumps or spread throughout the laundry. This will be an ongoing problem, since our daughter has long hair and I myself shed hair from my head like a chemotherapy patient with male pattern baldness (my apologies to everyone I’ve just offended). I assume that a spin in the good old dryer would suck all that fuzz out, but I’d love another solution. If any of you know how to deal with this, preach it in the comments below!

And let me emphasize this: I would not be doing this if I did not enjoy it. I like the feeling of taking responsibility for an essential chore in my life, taking back for my body a job I had once relegated to a machine. I’ll enjoy it especially once the weather warms enough in the spring so I can tote the whole shebang outside and do the wash in the fresh air with rainwater from our barrels. I pedal one load of laundry each Monday, Wednesday, and Friday, and from the first rotation of the pedals to the last clothespin, it takes about an hour. Not bad, considering I’m also getting my exercise, reading, and SAVING THE PLANET. Or at least, taking a little step toward it.

Because that’s all it takes to start, folks: a little step. You never get anywhere without taking that first little step. For me, because I have legs and dirty clothes, I’ve started biking my laundry; but for you it might be something else, some other little bit you can do. And it doesn’t matter how small that is, because the longer I work at this clay life, the more I’ve noticed it’s the little bits that make up a life, that make the difference between a meaningful life and one lived without thought or consideration.

And just to crush to death that metaphor of the road: you never know where your steps will take you. A year into biking the laundry and pouring the rinse water on my plants, I find myself considering the fibers in our clothes–will they biodegrade or will I someday kick a shovel into the earth and discover nothing but a web of plastic fibers? I’m toeing my way forward slowly here, aware that the next step may just turn me into a fanatic, which is not the sort of person I generally like, but hey, it may be entertaining for you!

So stay tuned.


Windows of Straw

November, 2018

So our little timber house has been clothed with straw, capped with metal, and now it’s time to add some glass. This last element we acquired from a house nearby via Craigslist, an entire house-worth of old-school sliders from Anderson. We supplemented these with two new ones we bought for the same price as those 10 reclaimed windows.

They made a precarious, swaying stack in the truck, but J. assured me they would survive the trip up our rocky, bumpy path/default road to the house. And to my relief, he was not wrong.

20181006_0913521.jpg

We had prepared the house to receive the windows by building window bucks, or frames, that sit on the straw bales and, because we’ve read “The Three Little Pigs,” we also attached them to the wooden structure of the house. We flashed each buck with sheets of ice & water shield, a thick, black tarpaper-like stuff, which will protect the bales below from any water that might leak into the window. The interior rough window sills, which are covered with plywood, also receive a layer of tarpaper, which runs down the exterior of the bales all the way to the base of the wall, another measure to keep those bales nice and dry and cozy.

20181012_144516
Flashed buck and sill, all ready for a window.

It only took a day, with help from a friend, for all the windows to go in. The work went so smoothly that, like those Amish ladies who purposely build a mistake into each quilt because only God is perfect, I took it upon myself to drop a chunk of lumber through one of the installed panes. I’m always looking for ways to be helpful.

20181019_150209
Exterior view, showing the flashing.


20181009_114857
Interior, south wall.


20181009_114730
Our little house, enjoying the fall colors through its new glass eyes.

Now for the work of completing the wall around each window.

We started with the window seats. My brother-in-law had given us the lumber from a white pine they had cut down–an entire tree’s-worth of miscellaneous boards ranging from half-inch sliver planks to great slabs of wood 4 inches thick and 20 inches wide. These last pieces we’re milling into our window seats. We debated leaving the live edge on the front of the benches, but in the end we figured our house will have plenty of “live edge” and could maybe benefit from the occasional straight line. So we trimmed them straight and will round them a bit with a plane to make a comfortable, organic bench front.

20181112_095331
It was a huge tree.

Three giant planks were enough to run nearly the length of the house for the window seats which line the south side. J. connected the three pieces with lap joints to make one continuous length of timber. He’s been missing the timber frame work, so he enjoyed cutting a few joints with the ol’ chisel and mallet.

20181117_142729
Lap joint. Broken pane of glass on right.

We also constructed a three-sided box (I guess that makes it a tray) out of scrap plywood and 2×4, to act as a header over the windows. This will support additional bales stacked above the windows. We mounted the header about four inches above the window to allow for a curved window-opening in the bale wall. If this doesn’t make sense, keep reading. Hopefully the pictures will clarify things, if my clumsy words don’t.

20181117_150814
The window seat is in place, supported from below by 2x4s let into the bales. We’ve temporarily propped the header above the window, but you get the idea. And yes, that is snow outside.

Once the headers were permanently supported with posts running up from the window seats, we started sculpting the curved openings around the windows. The way we’re doing this is by building baskets of diamond lath (affectionately named “blood lath” because it consists entirely of sharp edges) and then using our fists to ram the baskets full of straw, handful by handful, until not a straw more will fit. We start with the basket covering that four inch gap between the header and the top edge of the windows…

20181117_142916

…and once that’s done we start on the sides of each window. Below is the narrow space between two windows. Stuffing it with straw will both insulate the wall and provide a sculptural pillar supporting the wall above.

20181124_130335
Here, I’ve built the beginnings of the empty lath basket.
20181124_143504
And here the basket is partially filled with straw. I build the basket as I go up, which allows me to get my arm inside to stuff the straw in firmly, adding more layers as those below are packed in.
20181126_150137
This is what it looks like from the outside, all that tightly packed straw making a nice tight wall behind the exterior mesh.
20181126_150015 (1)
And those windows are done!
20181128_115926
But there is lots more to do!


The finished baskets really do look like elegantly curved pillars between each window, and I love how they look. They’re not designed only for their elegance, though. The openings to the windows are curved to allow as much light as possible into the room. And maybe you can tell from all the dim, grainy photos I’ve taken, this is November, which in our neck of the woods is the cloudiest, darkest month of the year, so we’ve got to make the most of what we have.

I’ve been eating my lunches in the window seats to absorb as much of that meager light and heat as I can, and I’ve discovered, leaning against those pillars, that they’re stuffed so firmly they don’t move or bend at all. They’re like…well, pillars. I hope this means that when we get around to plastering the walls with all their baskets, such a sturdy foundation will make the job (wink, wink) easy.

Before I end, I’d like to draw your attention to the fact that I have not been complaining very much in this post. I know, this is a big change. Turns out, as long as you wear enough clothes, twenty degrees is not a bad temperature for doing this sort of work. First, there are no bugs. Second, I have a roof over my head (a beautiful thing yet to lose its luster!) so rain or snow isn’t a problem. And since I have so many layers on that I look like a walking toasted marshmallow, the straw can’t reach my skin to irritate it. I’m discovering that the trick to dressing in layers is to wear enough to stay warm, but still fit inside the house, and/or be able to move one’s arms and legs.

Bring on your real cold, Winter. I’m not afraid of you.